If you’re looking for a sleek, powerful upgrade to your daily shower routine, the Rovate Shower Panel Tower System delivers an impressive experience—especially for its price point.

I’ve tested it hands-on and can break down exactly what to expect, how to get the most from it, and what to watch for during installation.
🧰 What’s Included
Before you even mount the panel, here’s what you’ll find in the box:
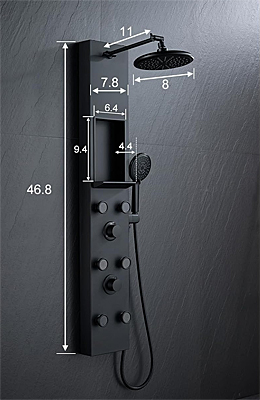
- Matte black stainless steel panel with built-in shelf
- 6 adjustable body jets
- Rainfall showerhead (self-cleaning)
- Handheld shower with flexible hose
- Adjustable shower arm
- Mounting bracket and hardware
- Basic instruction manual
✅ Installation Checklist
This panel is surface-mounted, meaning it connects to your existing shower plumbing without opening the wall. Here’s what you’ll need:
- ✅ Plumber’s tape
- ✅ Drill + tile-safe bits
- ✅ Silicone caulk
- ✅ Level
- ✅ Bucket/towel to catch water
- ✅ Wrench or adjustable spanner
Quick Tip: Do a dry fit before drilling—this helps ensure proper height for the overhead and jets.
🔧 Step-by-Step Setup Tutorial
Step 1: Shut Off the Water
Turn off your water supply at the valve. Drain the lines by turning on the shower briefly.
Step 2: Remove Old Fixtures
Unscrew the existing showerhead or combo unit.
Step 3: Install the Mounting Bracket
Use a level to mark your placement. Drill the holes and anchor the bracket securely.
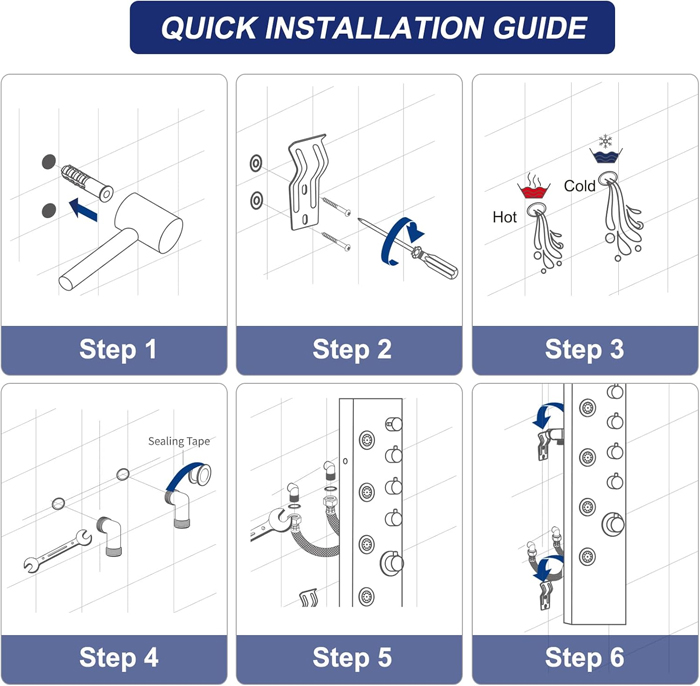
Step 4: Connect the Water Line
Wrap the shower arm threads with plumber’s tape. Hand-tighten the Rovate;s water hose to your pipe.
Step 5: Mount the Shower Panel
Hook the panel into the bracket and press it firmly into place. Ensure it sits flush and doesn’t rock.
Step 6: Seal the Edges
Apply a thin line of silicone around the back edges for a watertight finish.
Step 7: Test All Features
Turn on the water and try each function: rainfall, jets, and handheld. Check for leaks.
🧼 Everyday Use & Performance
- The rainfall head has a gentle but wide stream that’s great for relaxing.
- The body jets are manually adjustable and surprisingly strong—perfect for sore shoulders.
- The handheld sprayer is lightweight, with decent pressure and multiple spray settings.
- The built-in shelf is actually sturdy enough to hold shampoo bottles—nice bonus.
I recommend adjusting the diverter slowly—snapping between modes too fast may reduce water pressure briefly.
⚖️ Pros and Cons Comparison
| Feature | Pros | Cons |
|---|---|---|
| Design | Sleek matte black finish, modern look | May show water spots if not wiped down |
| Installation | Surface mount, easy DIY | Instructions are a bit vague |
| Water Pressure | Strong jets, good handheld spray | Rainfall head is more gentle than forceful |
| Build Quality | Durable stainless steel | Sharp corners if installed too low |
| Value for Price | Excellent feature set under $200 | Shelf is fixed, not adjustable |
💡 Final Tips To Get The Most Out of It
- If your water pressure is below 45 psi, only run one function at a time
- Add a shower filter if you have hard water to prevent mineral buildup in jets
- Wipe the panel down weekly to keep the matte black finish clean
- Use a clear silicone sealant to keep it looking clean around the edges
🔗 Reputable Buying Sources
- Amazon listing: Rovate Shower Panel on Amazon
- YouTube install overview: Search “Rovate Shower Panel Installation” for video walk-throughs
- Plumbing forums: terrylove.com/forums for real-world DIY feedback
Final Thoughts
The Rovate system offers a lot of shower for the money. If you want a modern, multi-featured panel that’s DIY-friendly and sleek, this one ticks the right boxes. Installation is straightforward with the right tools, and performance-wise, it delivers a spa feel—especially with those jets—without pushing your plumbing to the edge.
